The Ultimate Guide 2023 by Rubyroidlabs and Intexsoft
DNS Server Not Responding For Windows 8
DNS Server Not Responding Error: DNS server error is a common issue that can found in many computers which is caused by few technical issues. These issues will stop using the internet or any such things which relates to DNS server. It has been seen that many get confused that what is this problem and is there any need to call an expert to resolve it. Example from the web page
So here in this article we will let you know how to troubleshoot DNS error and may your browser work smoothly. There are much reason like router settings, UN plug-in or TCP/IP settings and many such that bring DNS server. If the link between browsers to the server is not correctly connected and broken by any of the technical issues, then we will observe DNS server error. So it is mandatory to confirm the issue and resolve it by your own as it is not that big.

Today we got few methods which will help you to troubleshoot the DNS error from your computer. These methods are to be performed sequel as any of the method will resolve the issues for sure. Else sometimes all the method need to be used to resolve the error completely.
DNS Server Not Responding Troubleshoot:
Let’s now start our guide to troubleshoot the DNS problem and make our system free from such error forever.
- Restart Router:
This is basic method that needs to performed, as sometimes not getting your router correctly connected will raise DNS issues. Once restart your router and you will get through these issues if it is connected to router. First switch off the current from Router and wait for 15 seconds to re connect it to switch. If this method doesn’t help you to resolve the issue then go with the below method.
- Configure TCP/IP Settings:
Sometimes it has found that due to sudden switch off the device, few settings from computer will be changed. This is why when we restart and try to connect using the browser we will face DNS server issues. So flow below steps and then configure the TCP/IP settings to resolve it.
Make sure you follow each steps courtly, as this may be new process for someone who doesn’t know settings.
- First click on Start button and the select control Panel
- In Control Panel, click on Networking and Internet option
- In this select view Network status and Task and wait
- Now click on Change Adapter Settings and right click on local Area Connection
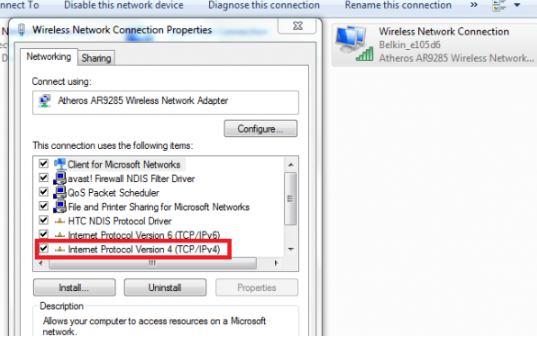
- Then Click on its Properties to select Internet Protocol Version (TCP/IP 6)
- Select its properties and then Obtain IPv6 Address automatically
- Here select Obtain DNS Server Address automatically and then click on Ok button
- Now again select Internet Protocol Version 4 (TCP/IP 4) and select its properties
- Now Oblation its IP address automatically and also select to obtain DNS server address
- Then click on OK button and you settings are done successfully
- Use Ipconfig Command Line Tool:
Use the Ipconfig command-line tool if your issues are not solved by above methods and this will for sure solve DNS error.
- Open Command Prompt from Start > Run box
- And in Command windows enter this Commands followed by enter in each step
ipconfig /flushdns
ipconfig /registerdns
ipconfig /release
ipconfig /renew
Fix DNS Server Not Responding For Mac OS X
Here we come up with the issues called DNS Serves Not Responding, which is mostly prominently known to those how use Internet in their PC or Laptop. It is the issues when Apps connected to internet from your Mac OS will be complaining of not getting connected. This problem is arises due to some technical issues in the connection. The chain between the Internet server and the Mac Device is lost due to some outage, and then the DNS server issues will arise. MovieBox

Below are few methods that will let you solve these issues, either of any method shown below will get this problem solved.
Method 1: Network Diagnostics:
Due to network problems this issues will arise mostly, as it avoid the connection to your browser to a particular network by giving diagnostics button. Follow this few steps and will definitely solve the issues if it is from Network.
- Launch Network Diagnostics using it button or Manually
- Open Apple menu and Click on System Preference
- Then Click on Network Option and then on Assist me
- Later click on Diagnostics Button and wait until the process starts
This will automatically solve any issues if it is related with the Wi-Fi or Cable, else it will guide you with some steps to solve the problem. If this can’t troubleshoot then proceed with the below given method.
Method 2 : Use Another App or Site:
If you have got this issue when using a particular Website or App then switches to another App or Site. This makes sure that this problem is related to a single site or with entire Mac device. If you can’t access the internet from one App then open any other App and try connecting with it. Else go down and check the Just Me button to know the details of problem arise. Else go with the methods that are shown here.
Method 3: Nudge Wi-Fi:
When the DNS issues arise, its better to check the Wi-Fi either you have entered any restricted website. Check the Wi-Fi menu at top corner of your Mac browser. Mac devices are known to hop onto very less desirable networks at inconvenient times. If you have got the Quotation mark at menu, then it shows the results of not getting connected. So turn your Wi-Fi Off and then restart it after 1 minute. If this solves your issues then good else restart your Mac Device and try to connect.
Method 4: Reset Router:
If the network issues haven’t gone correct by doing all the internal setting from your Mac device then try this method. First turn off your device and wait for few minutes and Turn On it successfully. If you come over the issues then reset the Router setting. Click a button on your Wi-Fi Router as reset and then try to login again using the browser. This will for sure help to use Mac Browser successfully. Make sure to open Google.com at first and then try to switch to other sites as preferred.
Any of these methods will for sure troubleshoot your issue and get you’re connected to internet from your Mac browser.
Dns Server Not Responding For Windows 7
Today we will be discussing how to respond when your PC shows DNS server not responding. It has been seen many a times when we switch to a new windows page, these issues will appear. Due to connection or technical issues this DNS serve will not get correct connection to get us the internet. So here in this article we have got few methods that will let you know how to resolve these issues. This problem may arise when you have switch on your PC for first time or while any of the connection went lose. Also when the settings went wrong this DNS issues will problem. So find the best troubleshoot method and get it work to resolve your problem.
To troubleshoot these issues try the following methods which are listed here. Anyone of this method will for sure help you to resolve this DNS problem.
Method 1: Restart the router
Restating your router will be a solution which can resolve this issue. As sometimes due to connection problems the connectivity can be lost. So Remove the power cord from the router and wait until all lights on the router have gone out. Then reconnect the power cord to the router and restart your browser. This may troubleshoot this DNS issues many a times else go with below methods.
Method 2: Configure the TCP/IP settings
Configure the TCP/IP settings is an internal work, so touch it if you any small knowledge of operating windows. Bu this following steps you can get better help to configure the settings.
- First Click on Start, and then on Control Panel option
- Then Click on View network “Status and Tasks” in “ Networking and Internet” menu
- Continue to click on “Change Adapter Settings” by scrolling down
- Then Right click “Local Area Connection” and then select Properties.
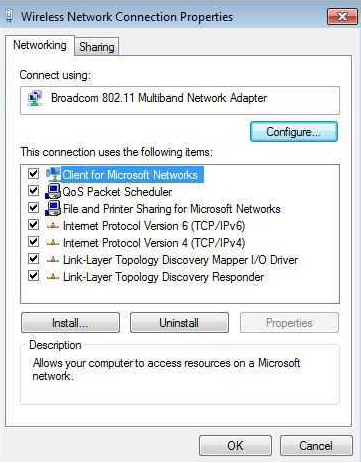
- Here Select the option as “Internet Protocol Version 6 (TCP/IPv6)” and again click on Properties
- Now Select on to obtain an “IPv6 address automatically” and then on to “DNS servers address automatically”
- Click on Ok and then select “Internet Protocol Version 4 (TCP/IPv4)”
- then click on Properties and Select Obtain an “IP address automatically”
- Also select to Obtain “DNS servers address automatically” and then end with click OK button
Method 3: Use the Ipconfig command-line tool
To go through the Ipconfig command-line tool process follow the below steps correctly as they may be some technically written.
- First step is to Click on Start and then type command prompt in the Search Programs and files box
- Then right click Command Prompt and enter to run as administrator.
- At the command prompt you need to type the following commands shown below
- Also don’t forget to Press Enter after you write each command in box
Ipconfig /flushdns
ipconfig /registerdns
ipconfig /release
ipconfig /renew
These are few methods by which you can resolve the DNS Serve issues. Any of this me this will for sure help you out and make you free from this problem.
DNS Server Not Responding For Windows 7/8/10/XP
DNS Server Not Responding Error: DNS Server error can be seen commonly in Windows PC or Laptop. This issue can be solved using the Windows Network Diagnostics tool that helps in troubleshoot the error. It will get you the line by showing your device is not responding to DNS server. This problem can be sending in Windows 7/8/10/XP which arises due to few technical and setting disrupt in the Computer. Here in this article we have got the resolve method which will help you to get out of this. So go through with the methods sequel and then you can easily get solved this issues.
So this would be a treat for all Windows users who are struggling the solve the DNS server issue on their desktop and laptop platforms. Well in that case I prefer to change the IP proxies and restart the computer at first, good enough if it works or else we can go on and follow reading the below methods which will surely solve the issue.
Fix DNS Server Not Responding Error In Windows 7, 8, 10
Here we start with our methods that will guide you to troubleshoot the issue.
Method 1: Fix Network Address:
At times due to setting changes in the DNS Server Not Responding Network this problem will in your Windows 7/8/10/XP computer. So first we will get to change the setting to normal and try to resolve it.
- First click on Start Button and the select Run
- Type “Network and Sharing” and click on enter button
- You can view the Network and Sharing Center windows on your screen
- Right click on Change Adapter Setting and then on Properties
- Here Click on Internet Protocol Version 4 and Click to Default setting
- Make sure you select DNS 8.8.8.8 and 8.8.4.4 as to default setting
Method 2: Change DNS Settings:
This is another method which can be considered if the above method doesn’t works. If the DNS Server error continues to exist then you have to change the DNS setting. Follow below steps and you will know how to change the DNS setting and resolve these issues.
- First Click on Start and select Run to open
- Here Type “Cmd.exe” to Open Command Prompt.
- Here type ipconfig/all and then click on enter button
- You will get the Physical address when you click enter
- Write the Physical address and then go back to Network and Sharing Center
- Now go with above method to select the DNS setting as written
- This wills for sure get the problem solved and will connect to Internet.
Method 3: DNS Reset:
If you the issues got solved then this is the last method with this the DNS Server will get connected. Only if the 1st method doesn’t works well we will go with this method. Here we will change the settings of DNS, as we have known that the problem is with connecting DNS Server. So get with the below given steps and let your browser connected with internet.
- Click on Start and open Run Box at bottom of the screen
- Enter “cmd.exe” to open command prompt page or
- Even by pressing Windows + R button from your keyboard
- Then In the New tab, enter this below given commands sequel
- Ipconfig /flushdns
- ipconfig /registerdns
- ipconfig /release
- ipconfig /renew > Enter
- netsh winsock reset
Make sure to click Enter after you enter each command. This will reset the DNS server setting from your Windows 7/8/10/XP and will solve the issues. Now Restart your Computer and open the browser to use the internet without any DNS Server Not Responding.
Dns Probe Finished Bad Config Windows 7/8/10/xp
Anytime when your surfing using the Chrome browser, you can come up with the “DNS_Probe_Finished_Bad_Config” error which then block the page you’re going to open. Many get stuck by seeing this error and won’t know what to do. But not to worry, as we have got this Article which will help to troubleshoot this issue. Here below we have got few methods that will direct to solve the “DNS_Probe_Finished_Bad_Config” in your Windows 7/8/10/XP.
The most common issue would be of server IP change which takes less than few minutes to rectify and change. But sometimes this issue arises due a lot of technical problems and such that you can them by reading the below guide.
How to Solve DNS Probe Finished Bad Config For Windows 7/8/10
This may be in some technical aspects so it is better to go with the below given methods if you know few certain things about PC Windows settings. Else you can just follow our steps and try to resolve the issues by your own.
- Resetting IP Catalog:
Here we begin our first method that is to reset the IP catalog. Catalog of IP address can be reset by the following few steps, which might be a key to get this problem while surfing. This is the basic method with which mostly the DNS Probe error can be solved.
- Click on Start Menu and Select Run to Open
- In Run box, type “cmd.exe” to open the Command Prompt. Window
- Now type nets hint ip reset in the windows and click on Enter button
- Then Type netsh winsock reset catalog and click on enter button
- Then restart the computer and open the browser
- This will reset the error given catalog with correct catalog for windows 7/8/10/XP
- If else you have got successes with this method, and then go with below given method to solve the issue.
- DNS Setting:
This is chosen as one of the easiest method to solve the DNS probe issues which is occurring form the browser. This will let you make some manual changes that will assure you of getting this problem fixed. So go through this manually steps to resolve the “DNS_Probe_Finished_Bad_Config” error.
- Click on to Open Network and Sharing Center from Start menu
- Now select Local Area Connection and then click on its Properties
- In the New Windows Select ‘Internet Protocol Version 4” and then click on its Properties
- Select “Use The Following DNS Server Address” button first
- Then Select “8.8.8.8 and 8.8.4.4” in the Preferred DNS Server
Later click on “Validate Settings upon Exit” box and proceed with OK button
Then your Chrome from Windows 7/8/10/XP will fix the DNS Probe Bad error for sure.
- Get Rid of Website Filters:
This problem will also arise when you have got installed few software’s in your PC or Laptop to block any site or to avid peeking of your family members. Mostly few go with software’s that lock the content that their household can’t access them. At times the Chrome starts showing these issues due to installation to making changes with browser.
- Temporarily Disable the Software
- Uninstall It
- Check Proper Browser
By purchasing a VPN will troubleshoot this problem forever. So try to get the VPN as soon as possible if you want to block any content from chrome.
Fix DNS Server Not Responding Error In Windows 7, 8, 10
DNS Server Not Responding Error: Today we will be discussing how to respond when your PC shows DNS server not responding. It has been seen many a times when we switch to a new windows page, these issues will appear. Due to connection or technical issues this DNS serve will not get correct connection to get us the internet. So here in this article we have got few methods that will let you know how to resolve these issues. This problem may arise when you have switch on your PC for first time or while any of the connection went lose. Also when the settings went wrong this DNS issues will problem. So find the best troubleshoot method and get it work to resolve your problem. Watch Free Movies From MovieBox easily.
Well with the advent of new modern wifi routers, there has also been an problem of server error created. In this guide we will be dealing with the custom ideas which can help us solve and provide finite solution for DNS Server Not Responding error.
The error caused by DNS Servers are very much similar and even simple to handle with. These DNS Server Not Responding In Windows 7, 8, 10 results due to bad IP Configuration which can be solved by following below method.
How To Solve DNS Server Not Responding Error in Windows 7, 8, 10 and MAC OS
To troubleshoot these issues try the following methods which are listed here. Anyone of this method will for sure help you to resolve this DNS problem. I guess the below methods would work find the error solution and result DNS Server Not Responding MAC to normal.
Method 1: Restart the router
Restating your router will be a solution which can resolve this issue. As sometimes due to connection problems the connectivity can be lost. So Remove the power cord from the router and wait until all lights on the router have gone out. Then reconnect the power cord to the router and restart your browser. This may troubleshoot this DNS issues many a times else go with below methods.
Method 2: Configure the TCP/IP settings
Configure the TCP/IP settings is an internal work, so touch it if you any small knowledge of operating windows. Bu this following steps you can get better help to configure the settings.
Fix DNS Server Not Responding Error In Windows 7, 8, 10
- First Click on Start, and then on Control Panel option
- Then Click on View network “Status and Tasks” in “ Networking and Internet” menu
- Continue to click on “Change Adapter Settings” by scrolling down
- Then Right click “Local Area Connection” and then select Properties.
- Here Select the option as “Internet Protocol Version 6 (TCP/IPv6)” and again click on Properties
- Now Select on to obtain an “IPv6 address automatically” and then on to “DNS servers address automatically”
- Click on Ok and then select “Internet Protocol Version 4 (TCP/IPv4)”
- then click on Properties and Select Obtain an “IP address automatically”
- Also select to Obtain “DNS servers address automatically” and then end with click OK button
Method 3: Use the Ipconfig command-line tool
To go through the Ipconfig command-line tool process follow the below steps correctly as they may be some technically written.
- First step is to Click on Start and then type command prompt in the Search Programs and files box
- Then right click Command Prompt and enter to run as administrator.
- At the command prompt you need to type the following commands shown below
- Also don’t forget to Press Enter after you write each command in box
Ipconfig /flushdns
ipconfig /registerdns
ipconfig /release
ipconfig /renew
These are few methods by which you can resolve the DNS Serve issues. Well the above methods can easily solve the solution for “DNS Server Not Responding” but still if you have any doubt then post it in below comments section.